
An Introduction to Mosaic Knitting
We’re going to be using mosaic knitting patterns in the Spring Stitch Sampler Knit Along. We would love for you to join us!
Spring Stitch Sampler Knit Along
- Week 1 – Pyramid Stitch
- Week 2 – Dotted Wave Stitch
- Week 3 – Greek Cross Stitch
- Week 4 – Key & Basket Stitch
If you aren’t here for the knit along, you can still learn about mosaic knitting and how to incorporate this simple colorwork technique into your next project.
Mosaic Knitting
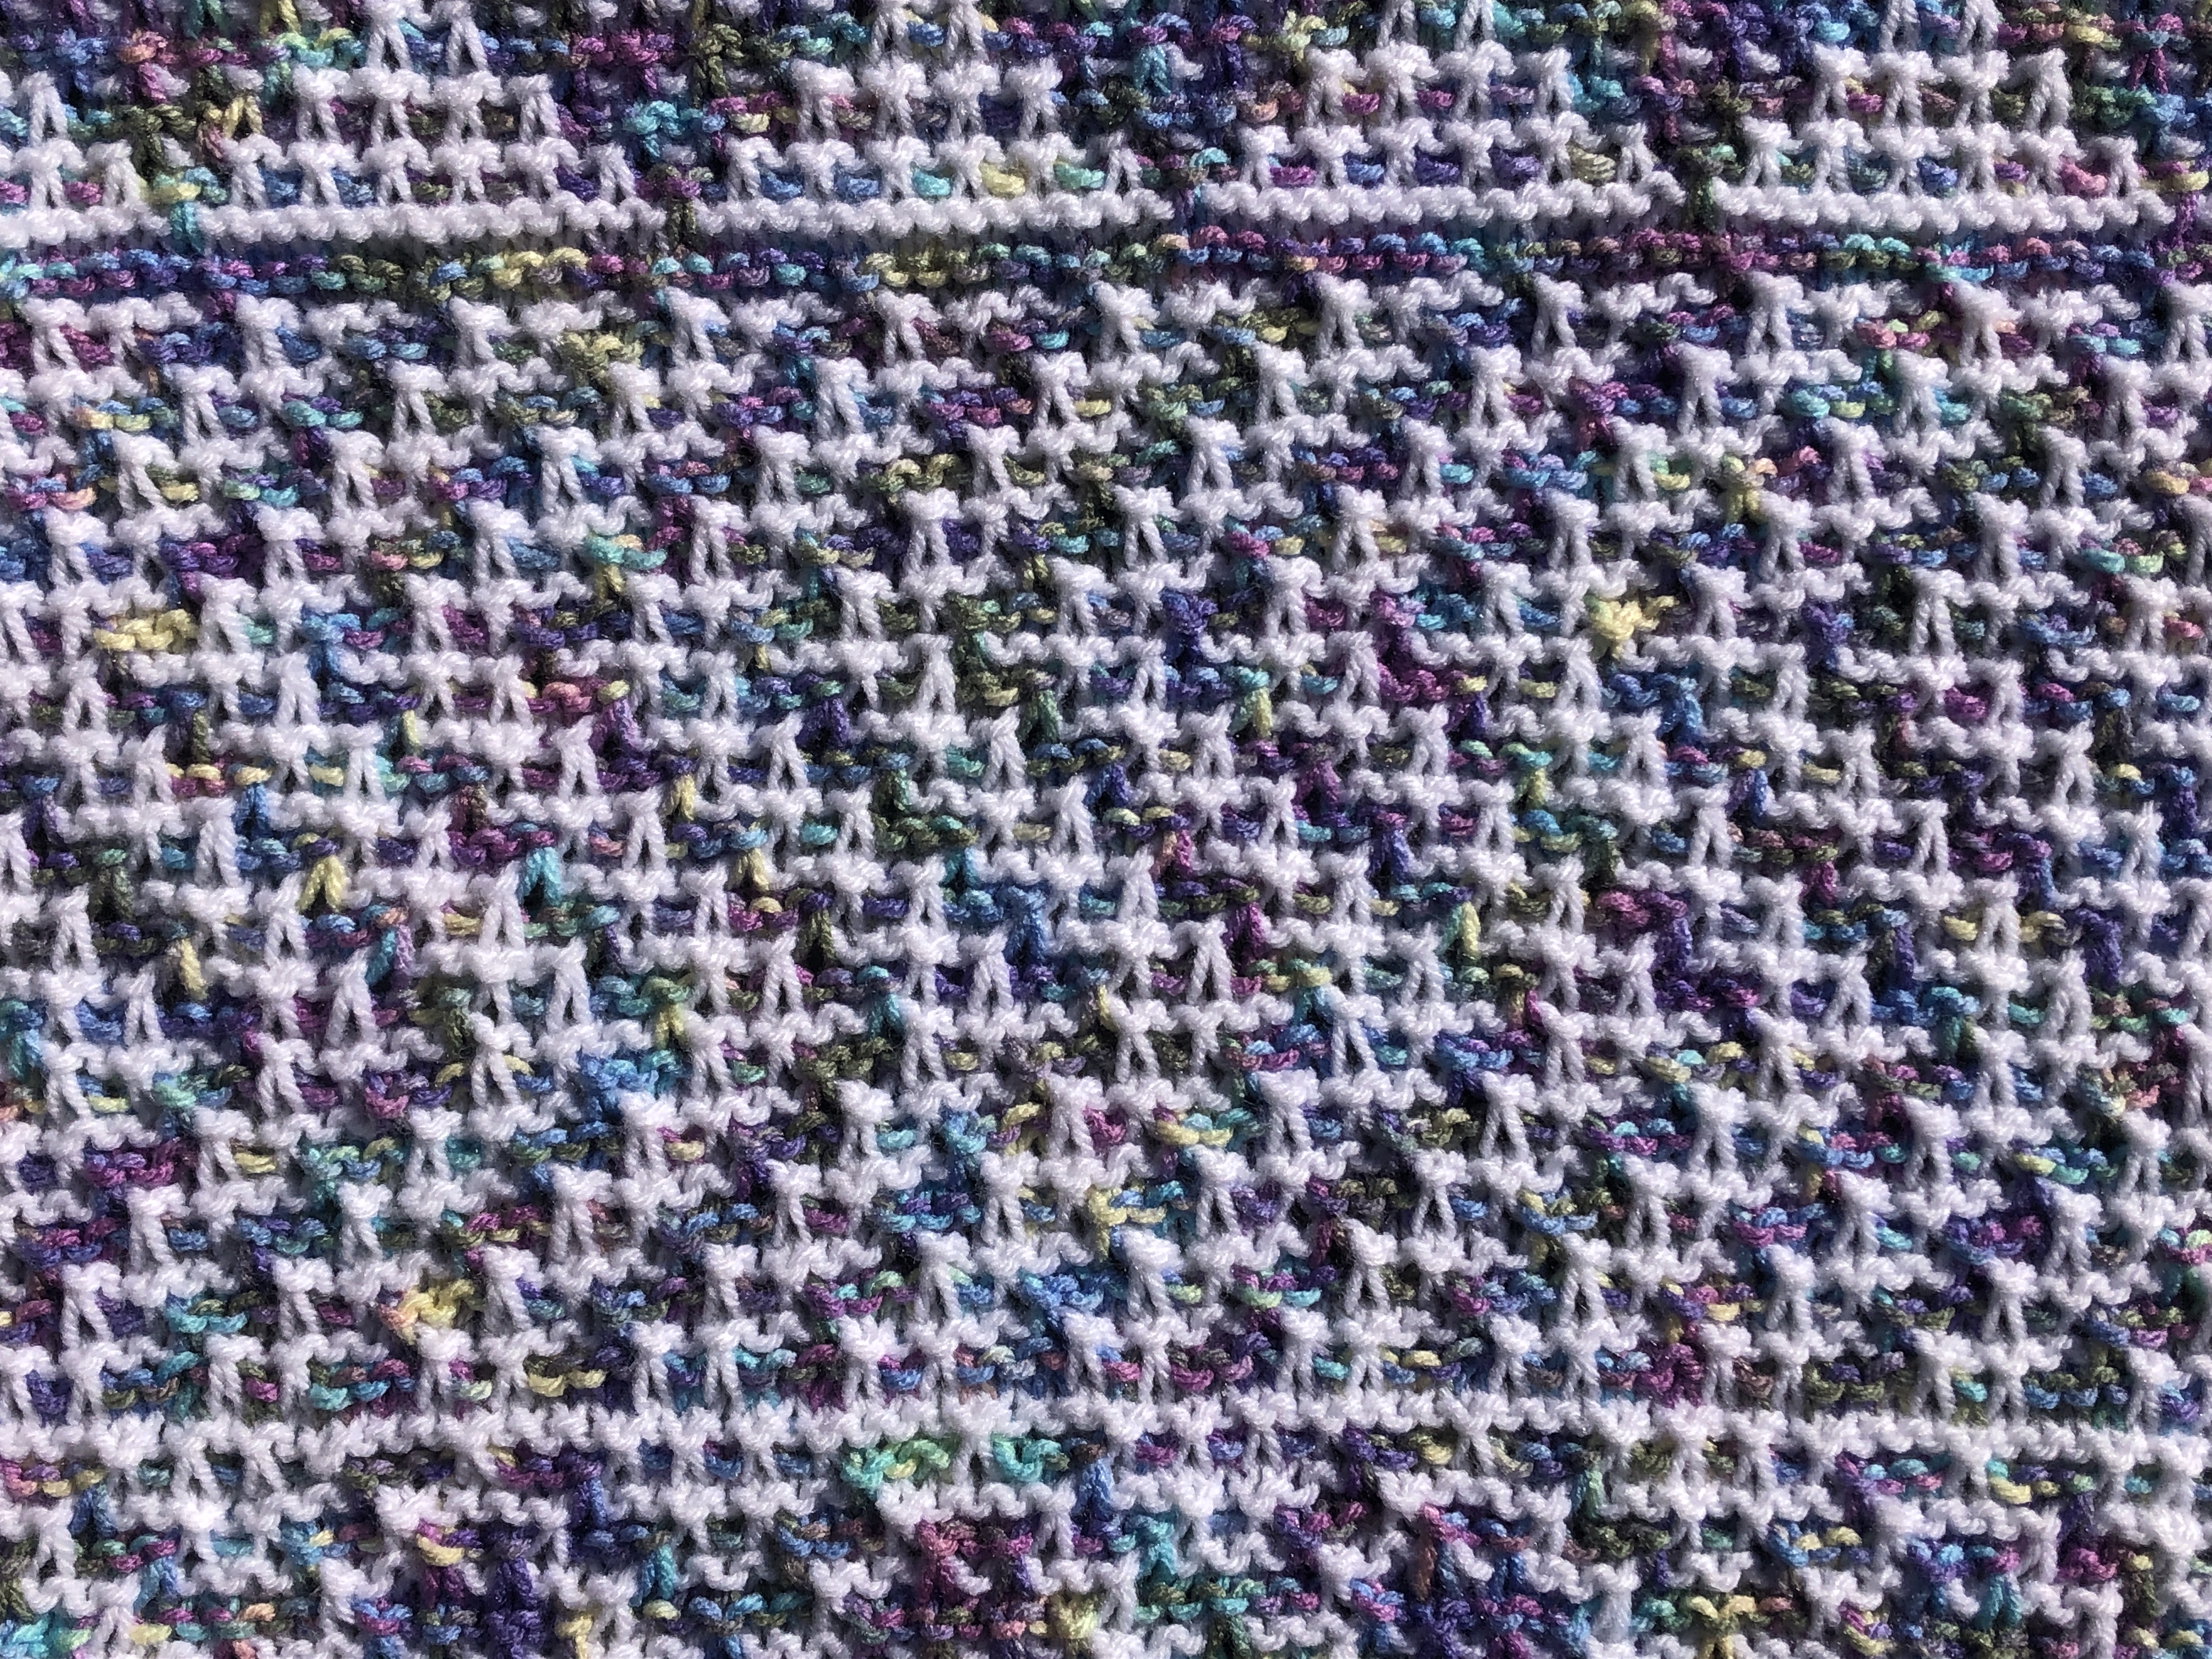
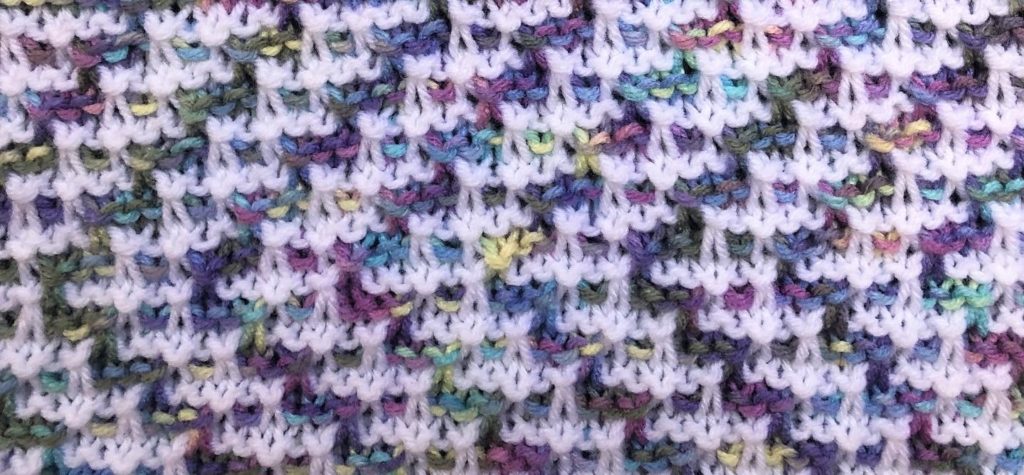
Mosaic patterns are intricate designs made by slipping stitches to carry color between rows. While the results look complex, the technique is quite simple.
Mosaic knitting is done with at least two colors, typically in highly contrasting colors. While working across a row, knit with the main color, slipping stitches from the previous rows (those already worked in the contrasting color) to form the pattern. Then double back, repeating the stitches on the previous row.
Most mosaic patterns are worked in garter stitch or Stockinette stitch, though some use a combination of the two. I prefer to use garter stitch patterns, as you’ll see in our Spring Stitch Sampler, because I prefer the look of the squatty, square garter stitches in repeating geometric patterns.
Key Points About Mosaic Knitting
While mosaic patterns call for multiple colors, only one color is ever worked at a time. This means that you don’t have to worry about tension as you carry your yarn on the wrong side of your work or catch any floats. The patterns do require lots of slipped stitches to maintain the proper tension and avoid long slipped stitches.
In mosaic knitting, you alternate colors every two rows. While knitting in Color A, stitches in Color B will be slipped. These slipped stitches will span two rows of Color A before being knit again on the following two rows in Color B.
While slipping stitches for mosaic knitting, always slip purlwise with yarn in back on right side rows and with yarn in front on wrong side rows. This positions the slipped stitches in the front of the work, creating the design. The wrong side of mosaic knitting isn’t hideous, but the design is not reversible.
Keeping your place in a mosaic pattern can be tricky if you aren’t used to knitting them. One way to stay on track is to follow the repeats, ensuring that they consistently line up with the previous row. For example, if the first stitch of your repeat is always above a slipped stitch on the previous row, you’ll know each stitch of the repeat should be above a slipped stitch. Remember that slipped stitches are used to carry colors up, so you won’t ever need to slip a stitch if it’s the same color that you’re working with.
Good to Know
It’s like the paintings, see? From far away, it’s okay, but up close it’s just a big ol’ mess.
Cher Horowitz, Clueless
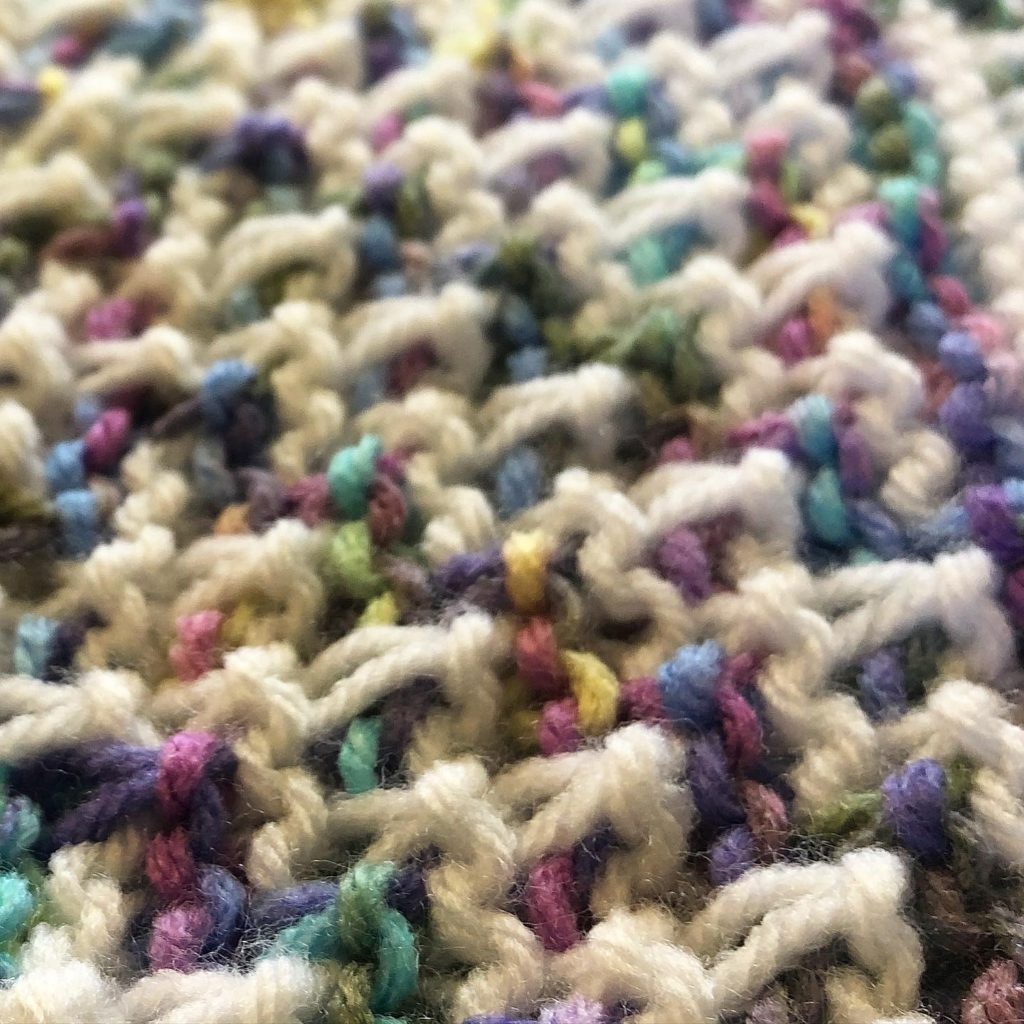
Cher was unkindly referring to a young woman, but this quote absolutely fits mosaic knitting. When you’re working on it up close, it can feel like an impressionist painting and the pattern can be very hard to discern. From a distance, though, the pattern emerges, almost like an optical illusion!
If you’re getting frustrated and think your work doesn’t look quite right, look at it straight on from across the room before you frog.
Note that this also makes mosaic patterns very difficult to photograph. I’ve had the best luck from afar and when perfectly perpendicular. If you photograph from an angle, the pattern can be easily lost.
Practice Mosaic Knitting Patterns
Grab some scrap yarn and see what you can work up! Practice with both the written pattern and chart.
Once you get comfortable, throw in a variegated yarn or two and see what happens!
Abbreviations
CO – cast on
k – knit
sl – slip
st(s) – stitches
wyib – with yarn in back
wyif – with yarn in front
Russian Stitch Swatch
This video will walk you through making a swatch in Russian Stitch. The written pattern and chart can be found below.
This stitch is worked in multiples of 5 + 1 stitches over 8 rows.
This pattern begins on the right side.
CO 16 sts and k 2 rows with Color A. These are your setup rows.
Row 1 (Color B) – *k4, sl 1* until 1 st remains, k1
For Row 2 and all even (WS) rows, knit all stitches that were knit on the previous row. Slip all stitches that were slipped on the previous row.
Row 3 (Color A) – k5, *sl 1, k4* until 1 st remains, k1
Row 5 (Color B) – k1, *sl 1, k4*
Row 7 (Color A) – k5, *sl 1, k4* until 1 st remains, k1
Be sure to work Row 8 as Row 2!
Repeat these 8 rows as desired.
Work 2 rows of Color B, then BO all sts knitwise.
Macedonian Stitch Swatch
This video will walk you through making a swatch in Macedonian Stitch. The written pattern and chart can be found below.
Note that in this pattern, Row 1 and Row 2 serve as the setup rows. Continue working them as the pattern repeats.
This stitch is worked in multiples of 4 + 3 stitches over 16 rows.
This pattern begins on the right side.
CO 15 sts.
Row 1 (Color A) – k all
For Row 2 and all even (WS) rows, knit all stitches that were knit on the previous row. Slip all stitches that were slipped on the previous row.
Row 3 (Color B) – k3, *sl 1, k3*
Row 5 (Color A) – k2, *sl 1, k1* until 1 st remains, k1
Row 7 (Color B) – k1, *sl 1, k3* until 2 sts remain, sl1, k1
Row 9 (Color A) – k all
Row 11 (Color B) – k1, *sl 1, k3* until 2 sts remain, sl1, k1
Row 13 (Color A) – k2, *sl 1, k1* until 1 st remains, k1
Row 15 (Color B) – k3, *sl 1, k3*
Be sure to work Row 16 as Row 2!
Repeat these 16 rows as desired.
Work 2 rows of Color A, then BO all sts knitwise.
Mosaic Knitting Charts
Mosaic charts are typically given in one of two styles.
The first style presents each stitch of each row in a single square and is read as a traditional knitting chart. Symbols are included: knit, purl, slip with yarn in back, slip with yarn in front. The chart is also color-coded; every two rows are shaded to indicate a contrasting yarn should be used. This one-to-one style is typically used when charts are provided for working in the round.
The second style is more common and presents two stitches as a single square. These two stitches are from the same column and worked in the same color. A guide on the side of the chart shows which yarn is in use on this row. When the square matches the color of the chart, the stitch should be worked. When it does not match, the stitch should be slipped. This is the type of chart we will be using.
Take a look at the charts below. They’re for the patterns that are written above. Can you read them?
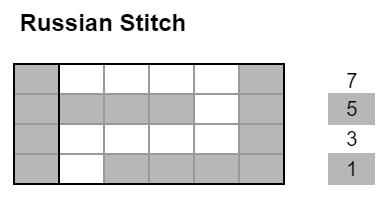
Let’s look at the Russian Stitch chart. Start on the right side, just as if you were knitting, and read to the left. The “1” indicates that this is the first row. The block is shaded, which means we should use the color we’ve designated; we’ll call it Color A.
So for the first row, we will use Color A and knit 4 stitches, slip 1 stitch (not shaded) with the yarn in back, and knit 1 stitch. We will repeat this until we reach the end of our work. Since the second row of this chart has a number 3 and no shading, we know this chart is telling us to work 2 rows for every single row of instructions. So we will come back, knitting the stitches we knit on the first pass and slipping the stitches we slipped on the first pass. (This time, though, we will slip our stitches with the yarn in front.)
Row 3 appears to begin with a dark square on a white row. We know, however, that we can’t start a row or end a row with a slipped stitch, so we will actually start and end Row 3 with a knit stitch. Knit 5, then slip 1 and knit 4. Repeat the last 5 stitches until you reach the end, ending with knit 5.
So why does this pattern’s chart feature a dark vertical column on both ends? It’s to help knitters visualize what they are working, despite the requirements of the technique.
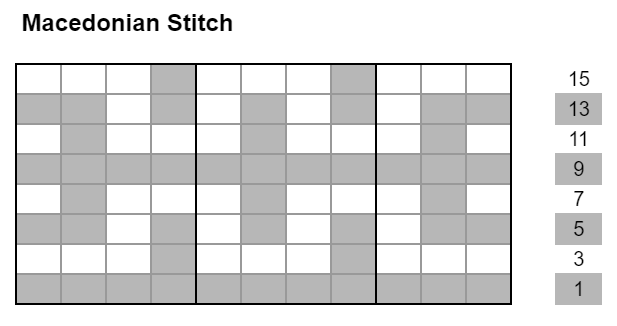
You’ll see three blocks in this pattern. The setup stitches (first three from the right), repeating pattern (center), and edge stitches (last four on left). This pattern gets a bit wonky when translated into a chart because it’s a mosaic stitch pattern and mosaics have a golden rule: never slip the first or last stitch!
Notice that in the written instructions for Macedonian Stitch, Rows 5 and 13 (identical rows) end with k1 to get around the “don’t slip the edge” rule. If you aren’t sure how to end a row when you’re looking at a chart, just refer back to the written pattern!
In this stitch pattern, Rows 3 and 15 also match, as do rows 5 and 13. With steadily repeating patterns, it can be easy to get lost when you’re new to mosaic knitting. Be sure to mark your place in the pattern with something like a post-it note or checkmarks. (Later on, this repetition will actually make it easy for you to knit without looking!)
Don’t let charts intimidate you. If you can work through the first row with one color, the second row will be intuitive.
If you find that charts just aren’t for you, that’s okay, too. They can still be useful. Compare your work to the design in the chart to ensure it matches and you’ll know if you’re following the written instructions correctly. In any case, both charts and written instructions will be provided for most patterns.
Mosaic Patterns
If you’re ready to try incorporating a mosaic design into a project, try these patterns:
Mosaic Gratitude Scarf
Plum Dishcloth Set
Don’t forget to join us for the Spring Stitch Sampler Knit Along!


5 Comments
Pingback:
Pingback:
Pingback:
Pingback:
Pingback: